
Forms Overview
Forms help you collect clear, structured information from patients before or after a visit. The experience encompasses the full lifecycle: from building a form, to the patient completing it, to reviewing submissions in the chart. Each step is designed to reduce friction for patients and give clinicians reliable, organized data.
Please note that forms are targeted to patients only, therefore, can only be shared with them.
Accessing Forms and Creating a New Form
You can manage all form templates and published forms from the Forms screen. To access it, open the main menu and select Forms. This page lists every form available in your practice, including published, unpublished, and archived items. You can sort, filter, and review activity directly from this view.

To create a new form, click Add Form. You can start from scratch with a standard form, upload a PDF, or choose from a pre-built template. Each option opens the builder so you can review and customize the structure before publishing.

Creating a Standard Form
The Standard option offers a flexible workspace for designing multi-section forms tailored to your practice. Each form can use a mix of text blocks, structured inputs, file uploads, and clinical information modules. The preview updates live, so you always know how the form will look once sent.

The form can include elements such as:
- Short/long text
- Numbers with validation
- Dropdowns, multiple choice, and yes/no fields
- Date and time inputs
- File uploads
- Matrices (single-select, multi-select, and text input), with optional scoring
- Contact and address blocks
-
Legal agreements
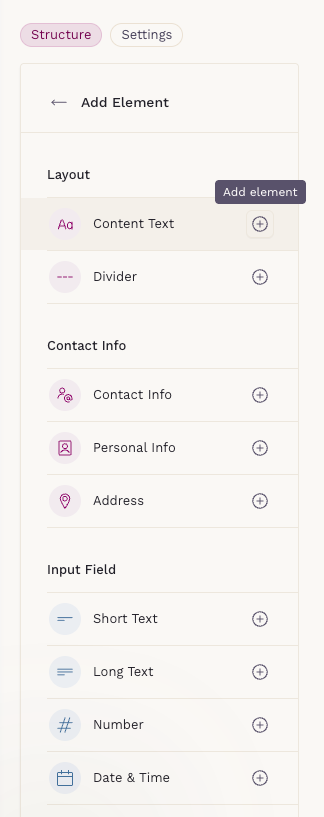

Every component follows clear rules set by the clinic—required fields, character limits, allowed ranges, alphabetical choices, and file-size limits. Conditional logic helps keep long forms manageable by showing follow-up questions only when needed.
Creating a PDF Form
You can also build forms by uploading an existing PDF, which is useful when your practice relies on standardized documents or needs to preserve a specific layout.
Please be cautious not to upload a password-protected file or a PDF that already contains interactive components.

Once the upload is complete, the PDF opens in an editor where you can place interactive fields directly on top of the document.

Inside the editor, you can add text inputs, checkboxes, and signature fields, positioning them precisely where the patient needs to enter information. Each field can be marked as required and adjusted to fit the original form's structure.

PDF forms behave like standard forms once published—they can be sent to patients, linked to appointment types, and later reviewed in the patient chart, where submissions appear as a non-editable PDF viewer.
Using Templates
Templates give you a faster way to build forms without starting from scratch. Each template can be customized once duplicated—sections can be renamed, questions edited, components added or removed, and conditional logic adjusted to match your needs.
Please note that templates are for convenience only and may not meet all clinical or legal needs. Clinics are responsible for testing and validating them for accuracy before using them with patients.
Previewing and Publishing Forms
Before sharing a form with patients, you can use the preview option to confirm that the layout, fields, and instructions appear exactly as intended. The Preview button is located in the top-right corner of the screen.

The preview reflects the full patient experience, allowing you to verify spacing, conditional logic, and required fields.

Once everything looks right, publishing the form makes it available to send directly or link to an appointment type.
Any edits made after publishing automatically generate a new version, ensuring that forms previously sent or completed remain unchanged and fully preserved.
Sending Forms to Patients
Send from the Forms Table
You can send any published form directly from the Forms table. Selecting Send form opens a panel where you can choose one or multiple patients, add an optional message, and send the form instantly. This is helpful when you need to distribute a form broadly or outside of a specific appointment.

Send from the Patient Chart
Forms can also be sent directly from the patient chart using the Send forms button. This opens a full list of published forms, allowing you to select one or multiple items before submitting them to the patient. This workflow is ideal when reviewing a chart and identifying forms the patient still needs to complete.

Send on a Chat
From the patient’s chart or the Inbox, open a chat and click the Forms icon next to Attachments. Then, select one or more forms from the list to share.
The form will appear as a message in the conversation, and the patient will also receive an email notification with the form link. They can access and complete the form from either the chat or the email.

Linking Forms to an Appointment Type
Forms can be linked to appointment types either from the Form settings or directly within the Appointment Type settings. Once linked, the forms are assigned automatically every time that appointment is booked. Patients receive the secure form links as part of their appointment confirmation and reminder messages. Only pending forms are displayed—any form they have already completed is automatically hidden—so patients always know exactly what they need to fill out before their visit.

How Patients Fill Out Forms
Patients will receive a link by email once a form is sent to them.

Forms are web-based rather than inside the app, so they can be opened on any device size.
Even though the forms are linked to the patient chart, they will not come prefilled with any personal information for security purposes.
How Forms Appear in the Chart
All activity flows back into the patient chart, helping your team review, document, and track progress in one place.

Form list and statuses
Each form appears under the Forms tab with statuses such as:
- Submitted (Pending review)
- Submitted (Reviewed)
- Pending submission
Reviewing responses
Opening a form displays the full submission, organized by the structure you created. Clinicians can scroll, add the content to a note, mark items as reviewed, and view activity logs showing who sent, opened, submitted, or edited the form.
For forms with editable fields (Regular Forms), clinicians can update values directly inside the chart. Legal elements and patient-uploaded files cannot be modified.
Scored forms
For scored forms (such as PHQ-9), the chart displays:
- Score per matrix
- Total score (if enabled in form settings)
- Result definitions, if configured
This makes it easier to identify severity thresholds and document follow-up plans.
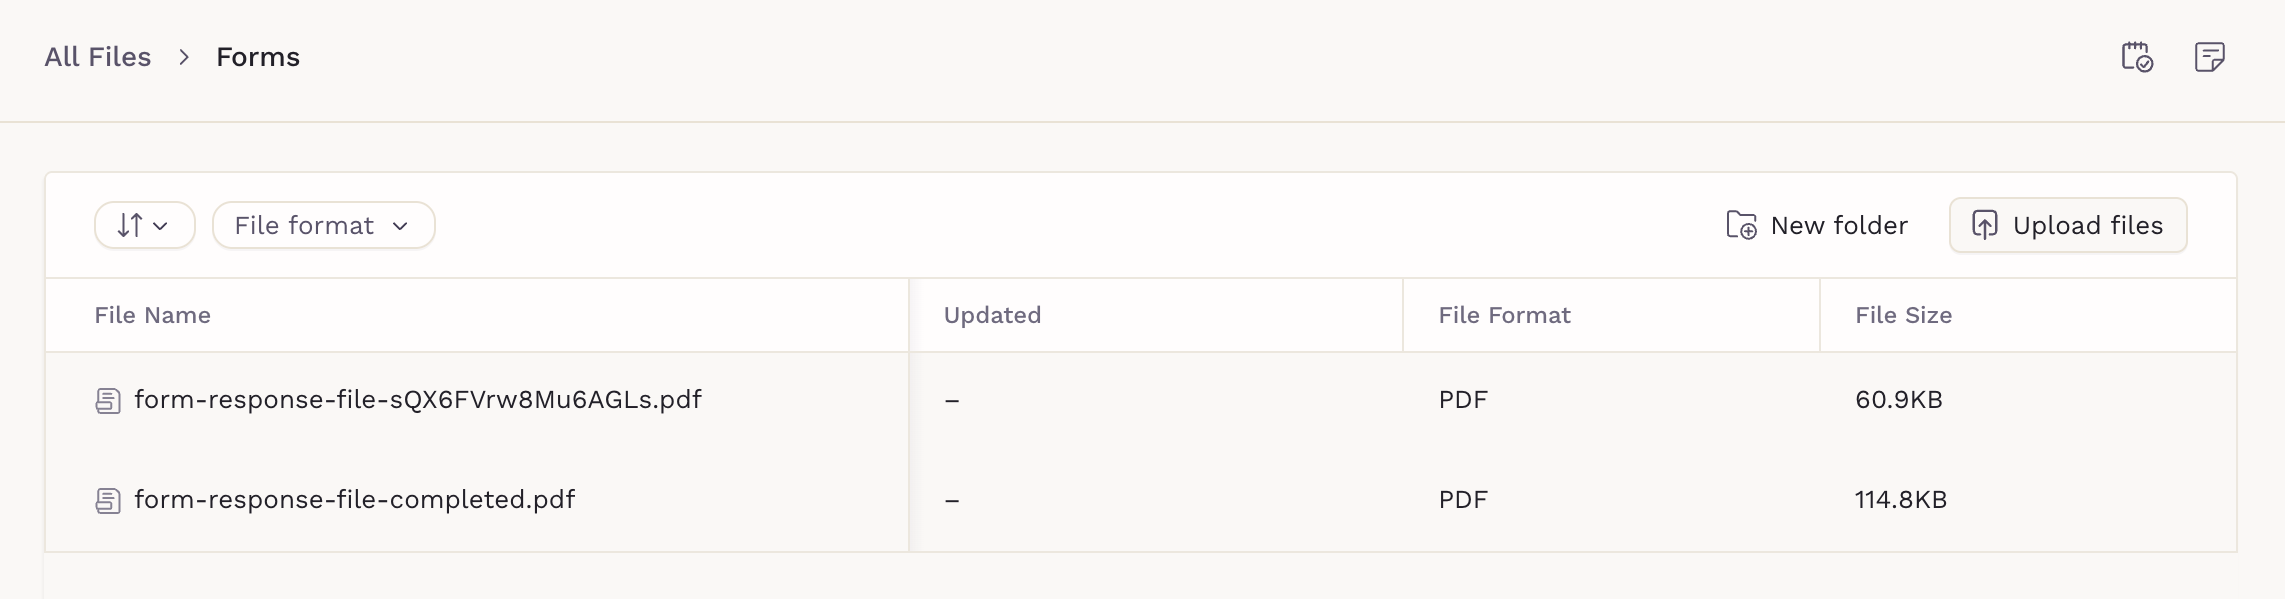
Where patient-uploaded files are saved
Any files uploaded by patients are automatically stored in the Patient Files. These files are organized under the Forms folder, making it easy to find documents submitted through intake forms or questionnaires without manually sorting or moving them.
Summary
Forms support clinics at every step of care. The builder helps you design structured, reusable inputs, patients complete them quickly from any device, and clinicians receive organized responses that automatically connect to the right place in the chart. Whether you're collecting health history, screening data, consents, or administrative documents, forms provide a clean, reliable path from patient entry to clinical decision-making.